
May 29, 2026
Fedi Pro Tips: Six Useful Things You Didn’t Know You Could Do
If you’ve used Fedi for a while you’ve likely realised that Fedi is so much more than a Bitcoin wallet. It’s a feature-rich, multidimensional app, so it can take time to fully wrap your head around all that it has to offer.
Aside from making bitcoin transactions and chatting with friends on the app, there are some other nifty features that you might have missed.
So, we wanted to take a moment to share a few tips that can help make the most of Fedi.
Here’s what’s inside:
Tip 1: Transfer Stable Balance Funds
Tip 2: Long-press QR Codes to Share Them Faster
Tip 3: Create a Multispend Group
Tip 4: Create a CSV of Your Transaction History
Tip 5: Customise Your Experience with Fedi
Add a Profile Photo and Update Your Username
Change Your Language
Change Your Currency
Add a Pin
Tip 6: Onboard Your Friends Faster
Tip 1: Transfer Stable Balance Funds
Stable balance allows you to protect your bitcoin from volatility. It pins the value of your bitcoin to a desired amount of fiat.
While you may have noticed or even used the Stable Balance feature, did you know that you can make Stable Balance transfers to another Fedi user?
In our 26.4.0 release, we introduced the ability for you to transfer money to a Fedi user from your Stable Balance wallet.
Imagine sending $20 in bitcoin to a friend and they receive the same amount (minus transaction fees) of stabilised bitcoin.
Here’s how to do it:
Step 1: Click on the wallet icon in the bottom left corner of the screen. To select the wallet service you’d like to use, click on the three parallel lines at the top right corner of the screen.
Step 2: Select the “USD” option in your wallet of choice.
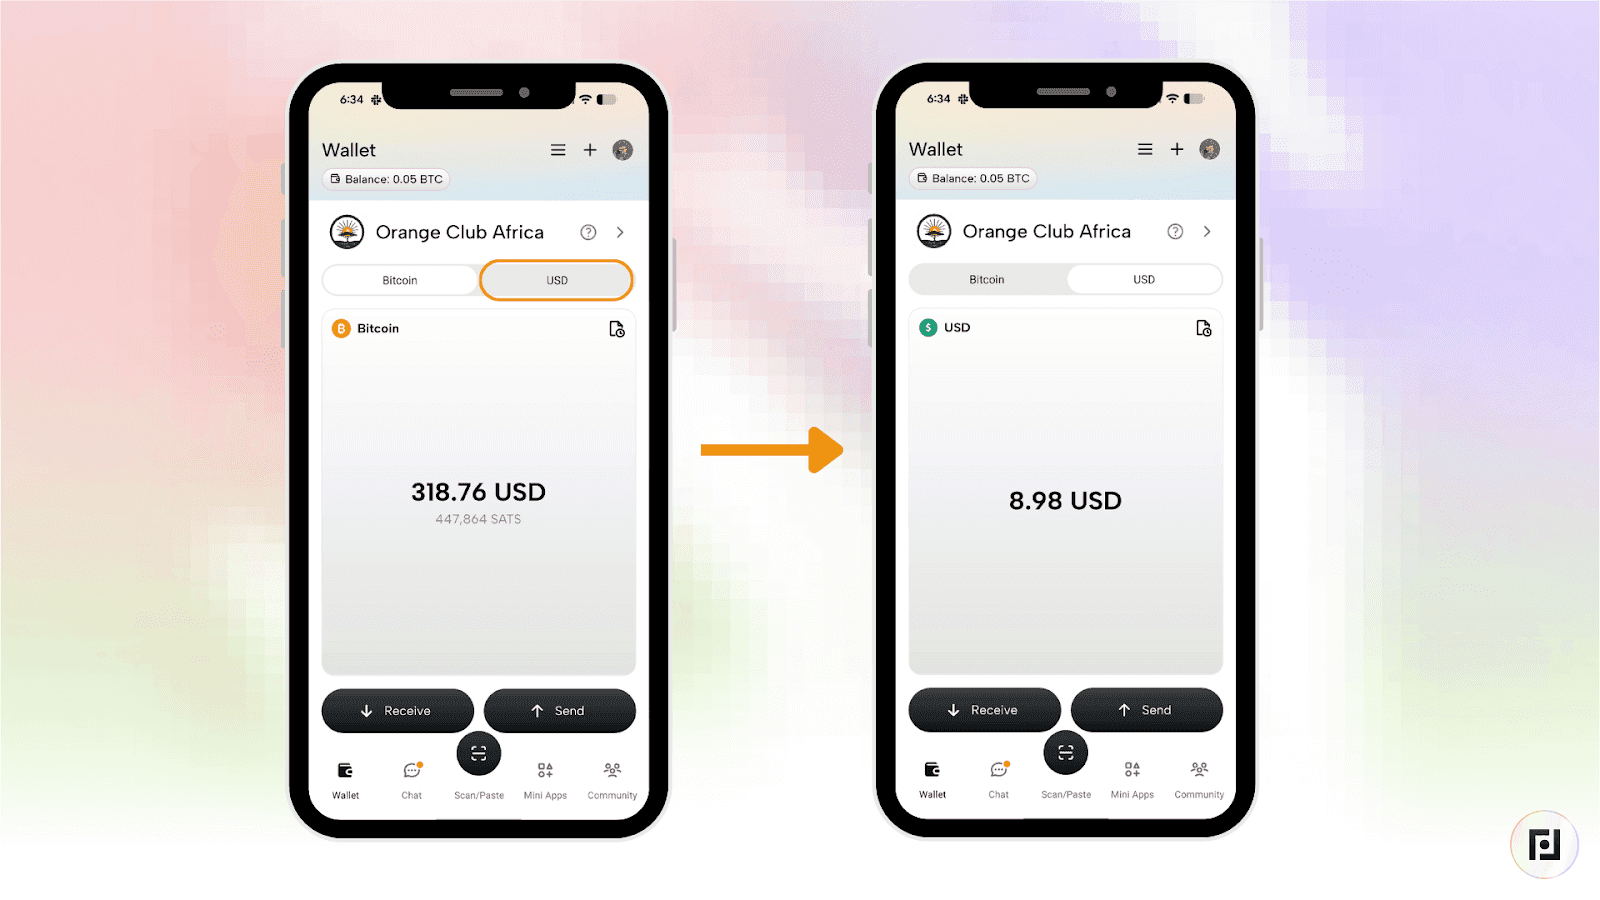
Step 3: Click the “Send” button, then click “To User” from the toggle bar at the top of the screen.
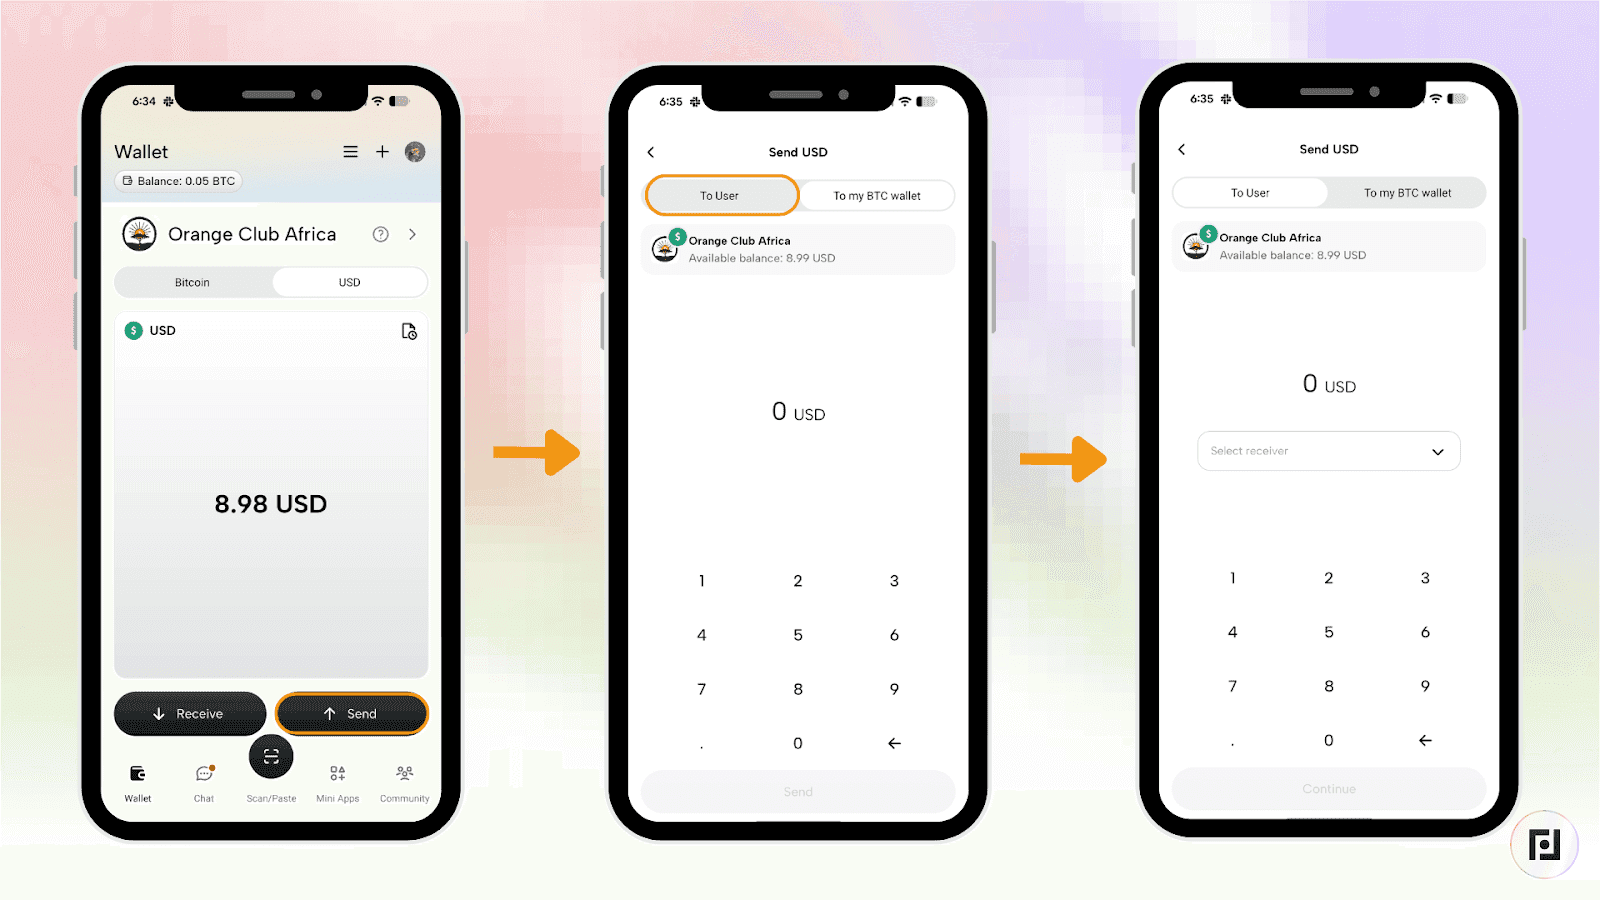
Step 4: Click the bar with the “Select receiver” text inside and either select the user you’d like to send to from your contacts or input the user you’d like to pay. You can scan a user’s QR code to add them by using the scan icon. Enter the amount and click on “Continue”.
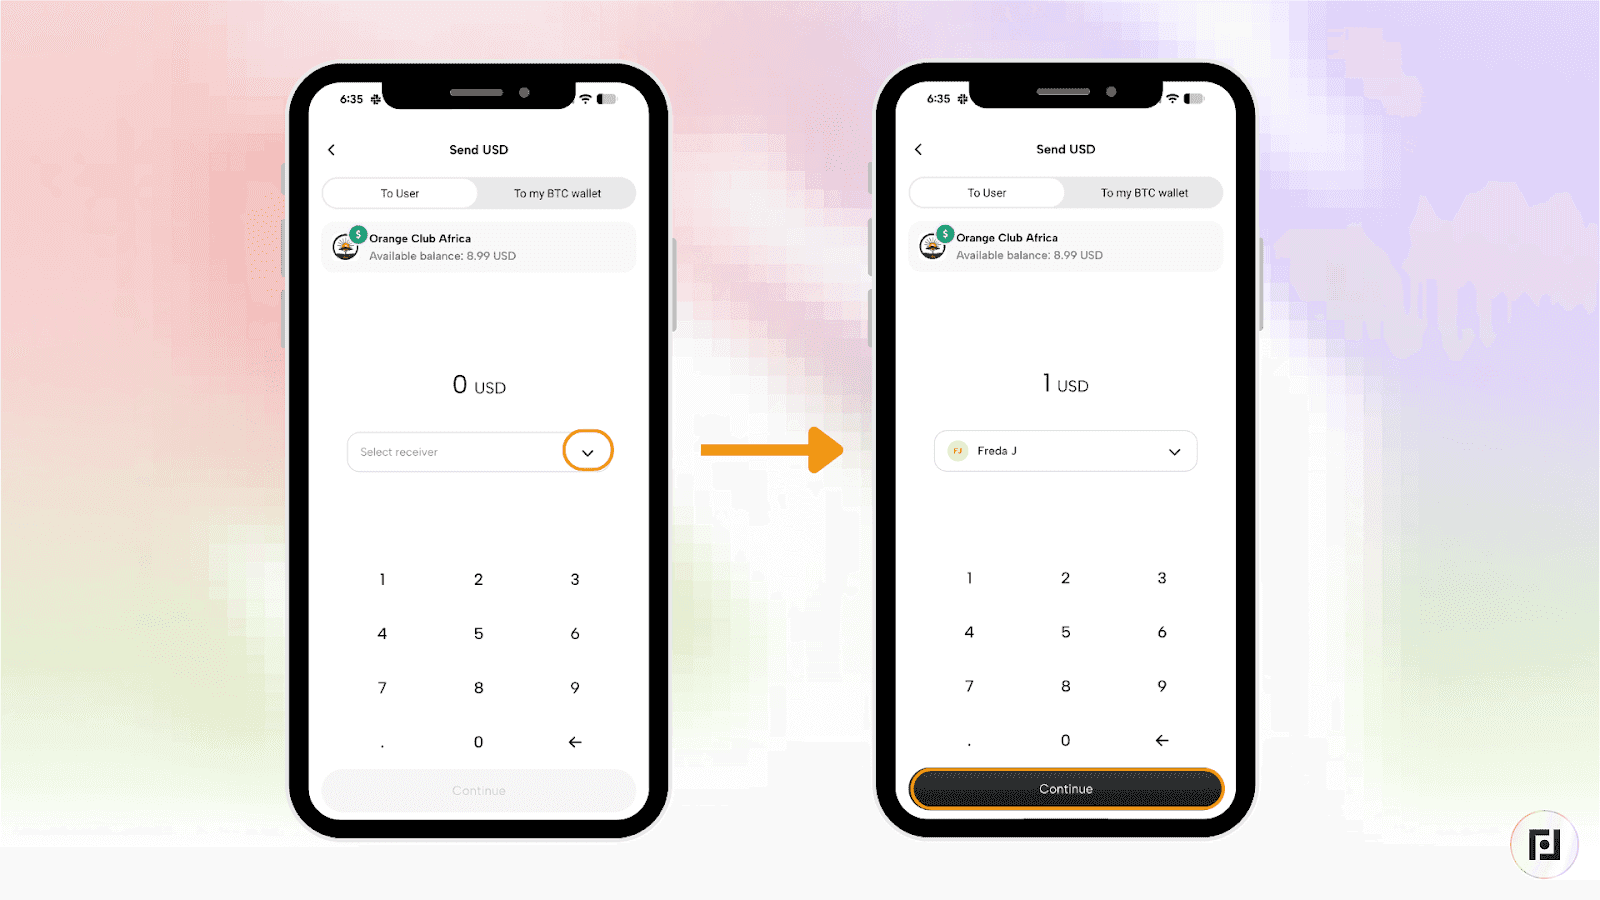
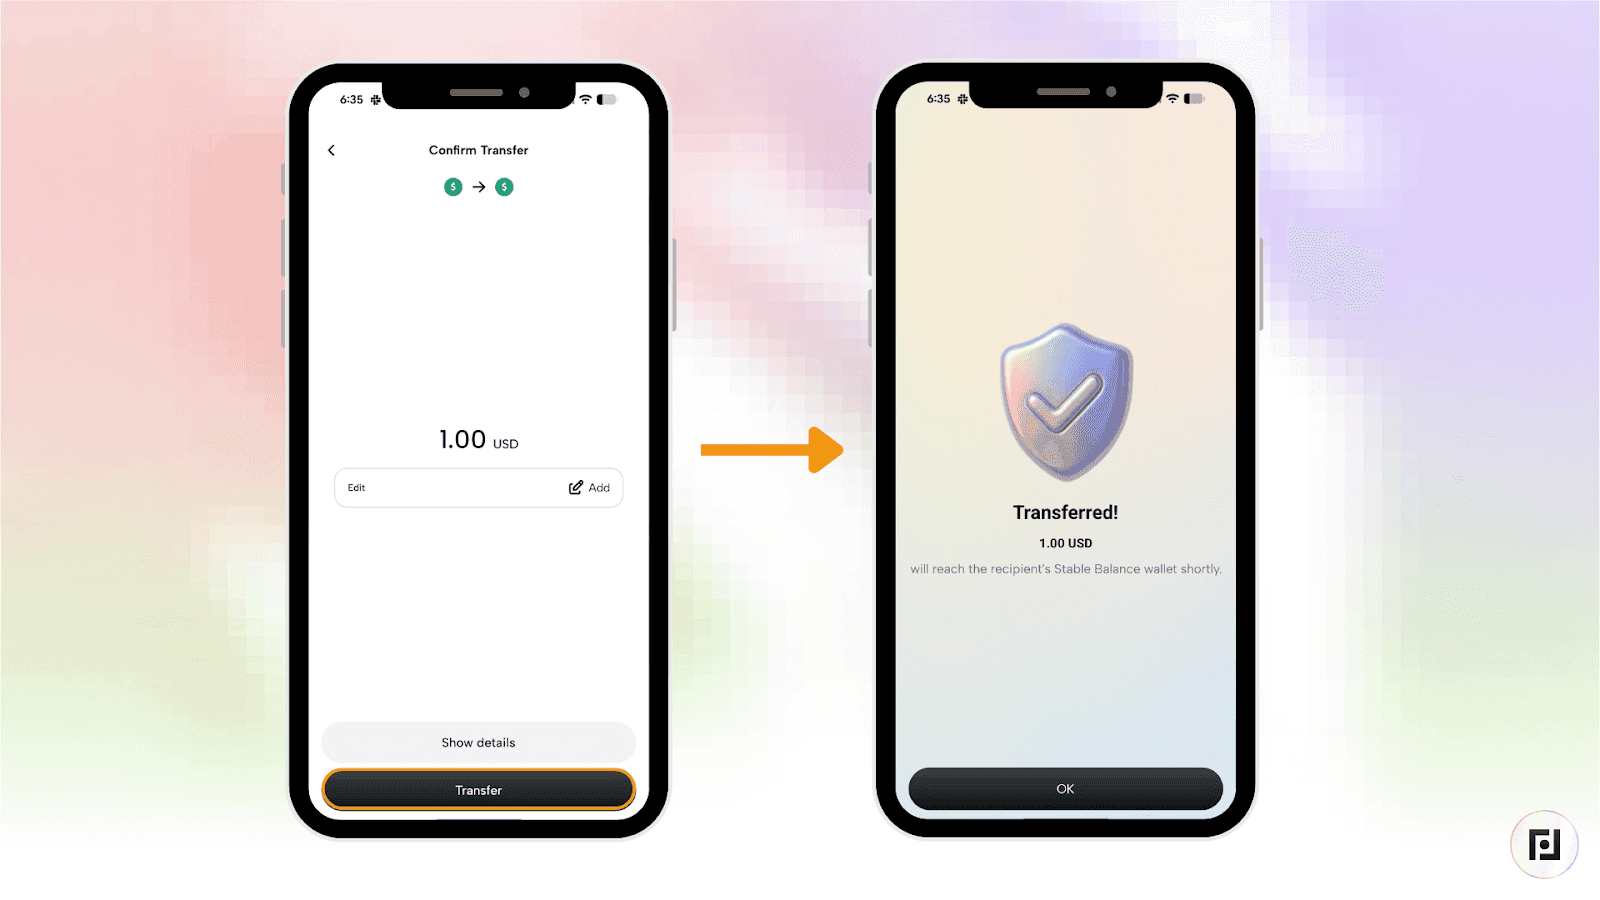
Step 5: Input the dollar amount you’d like to send. Then, add a note if you’d like, and click the “Transfer” button.
Tip 2: Long-press QR Codes to Share Them Faster
If you've used a wallet on Fedi, it might already be second nature for you to copy a Lightning invoice or hit the “Share” button to forward an invoice to a friend.
But there’s a way that lets you share your Lightning invoice even faster.
Next time you want to send your Lightning invoice, long-press the QR code. This copies your invoice ready to share with anyone.
Tip 3: Create a Multispend Group
One of Fedi’s newest features is one that helps you save with your community, donate for a cause, or make payments in a way that’s transparent within a group. This feature is called Multispend. It offers the functions of community savings traditions like the South African “stokvel,” the Indian “chit fund,” and so on.
Here’s how to create a Multispend group with members of your community:
Step 1: Start a Multispend Group
A Multispend group is like an upgraded chat group. To enable a Multispend group, you first have to create a chat group.
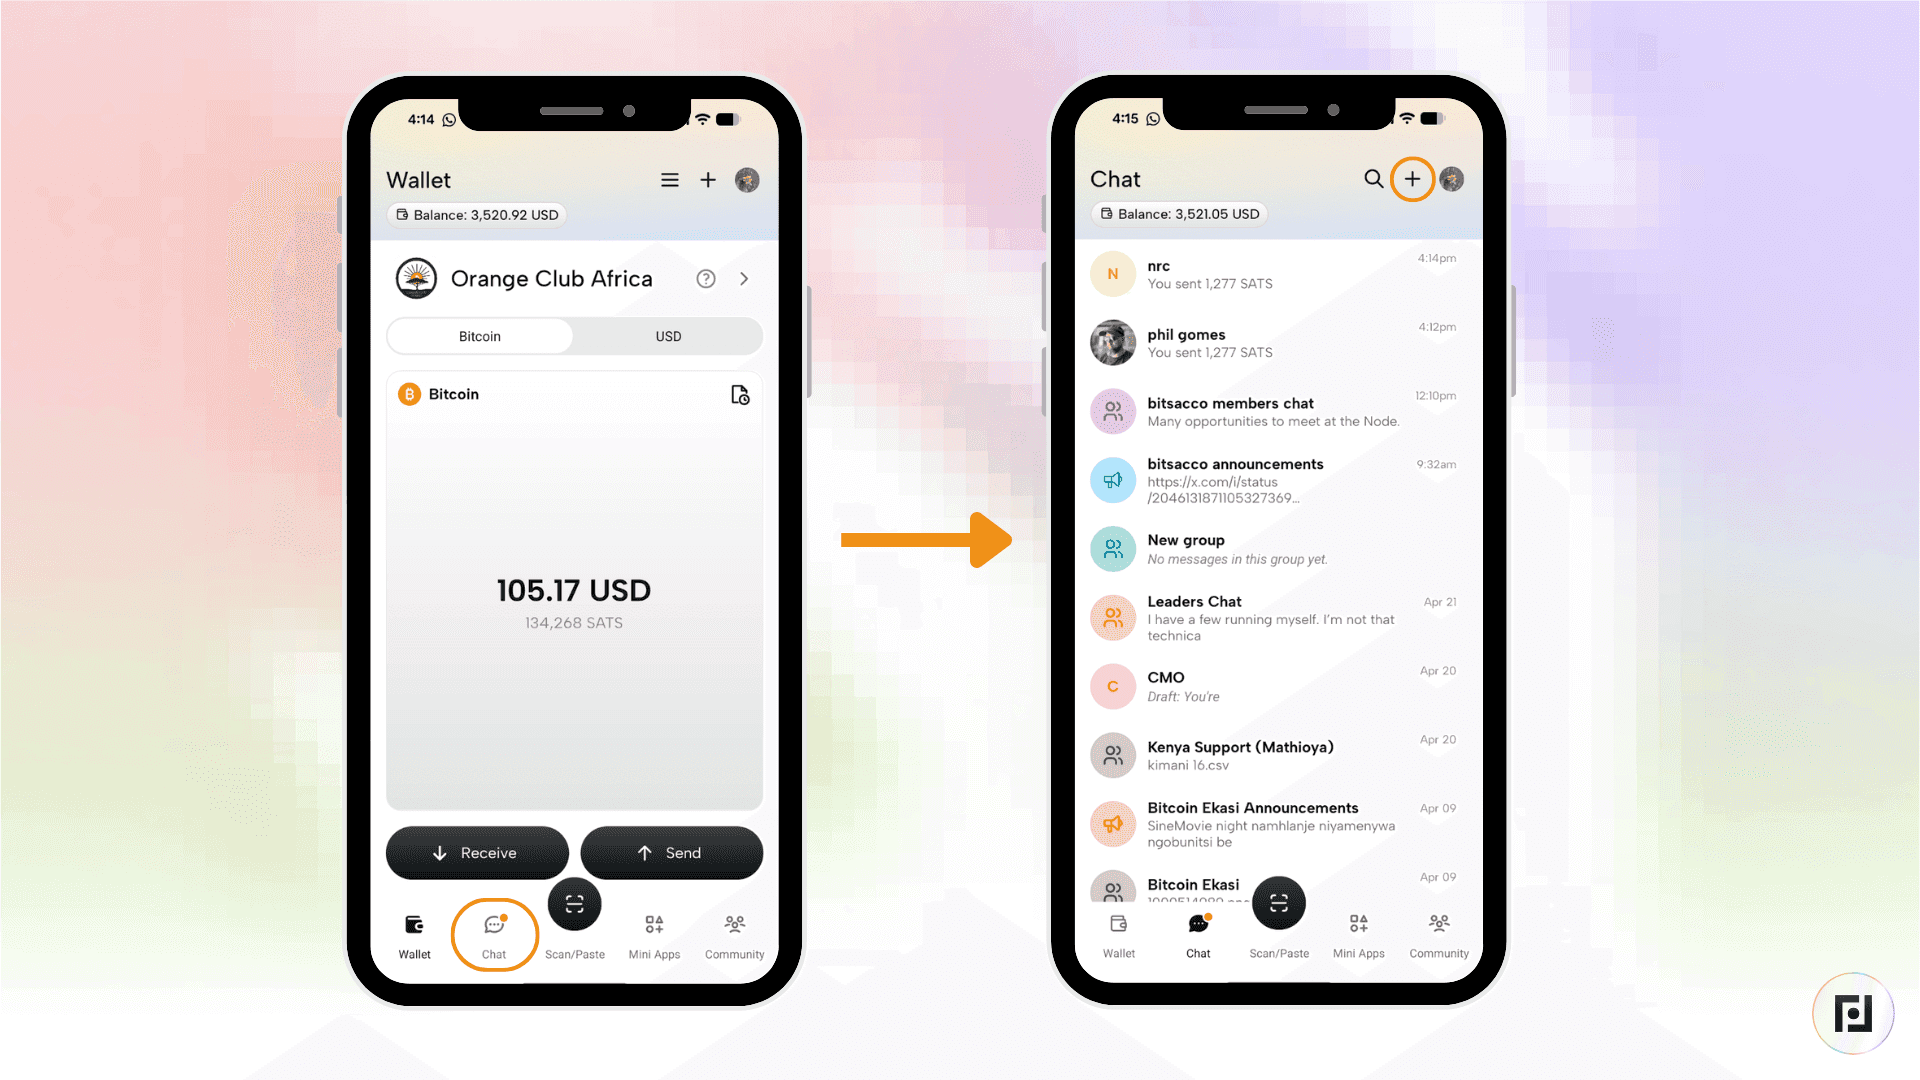
Click on the chat icon at the bottom of the home screen and then click the “+” icon at the top right corner of the screen.
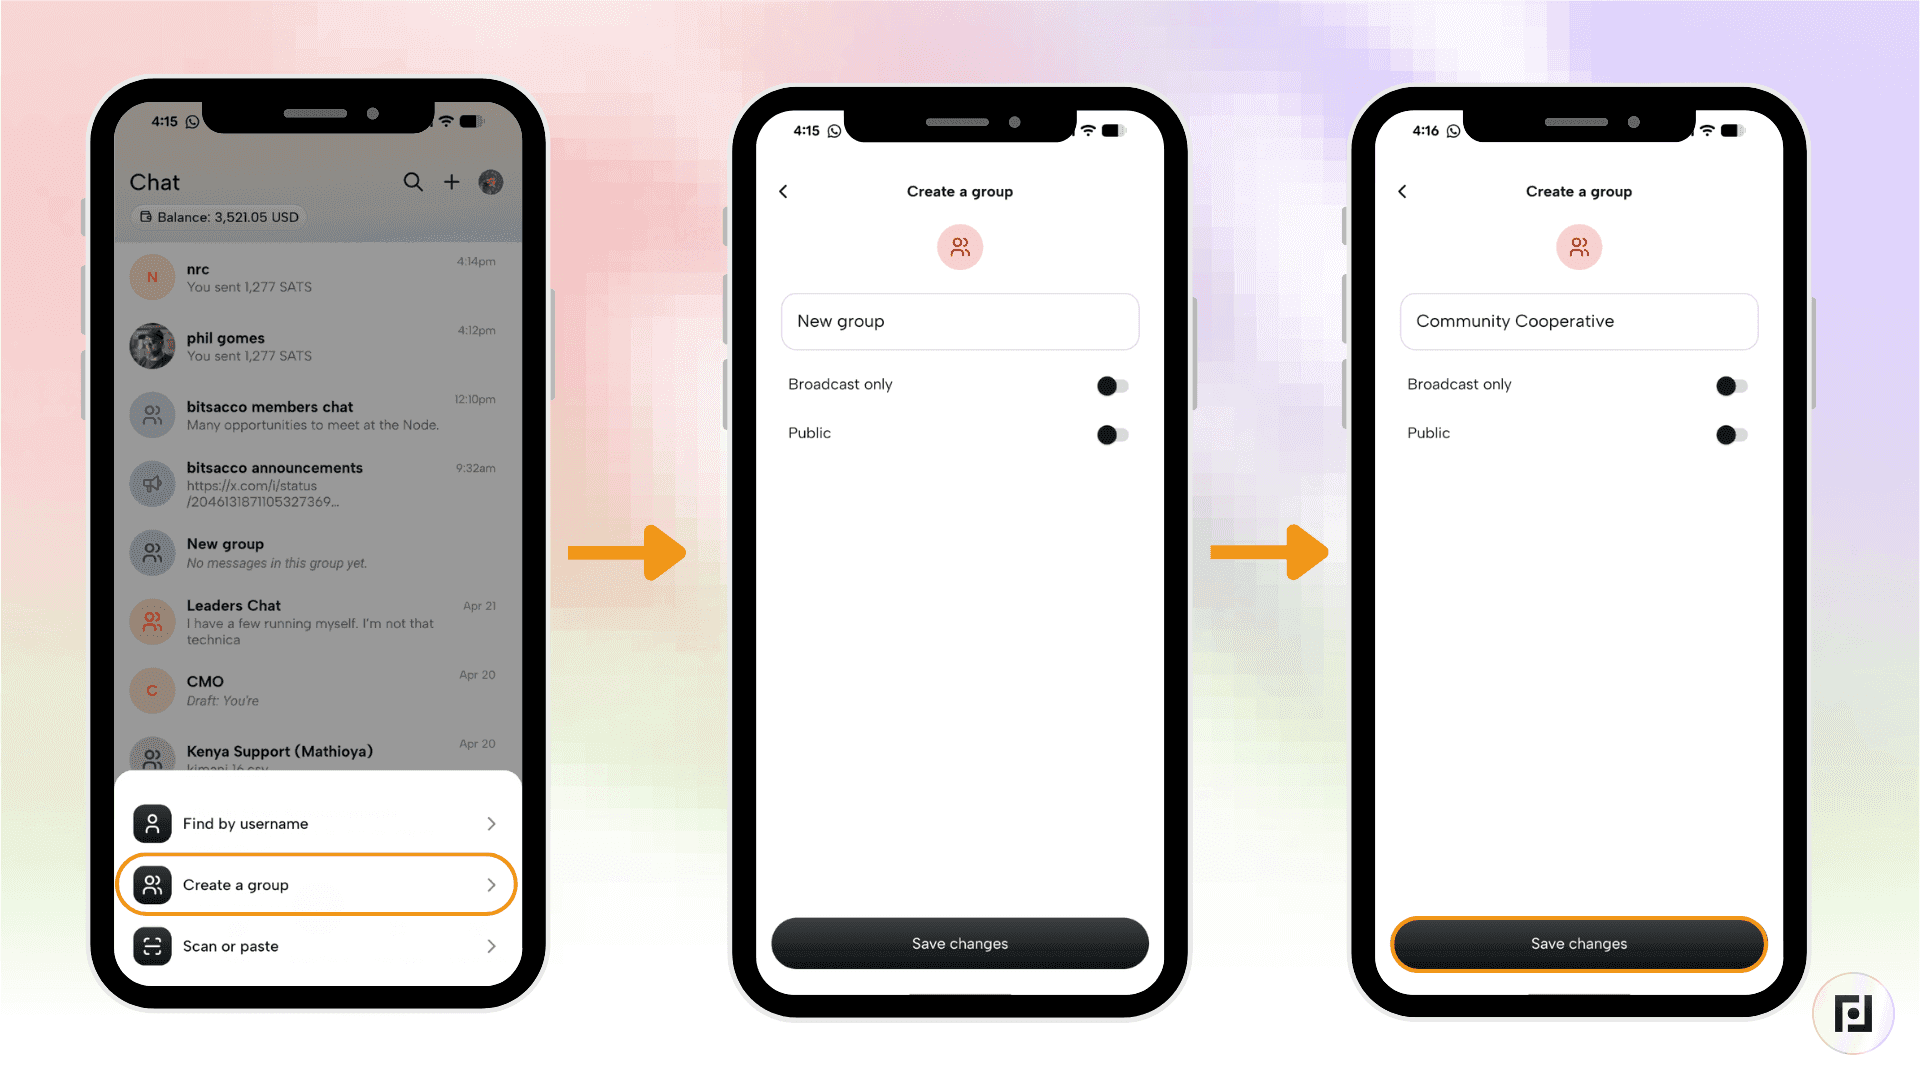
Step 2: Click “Create a group” from the pop up menu, and name the group in the field that reads “New Group” before clicking the black “Save changes” button. (Leave the “Broadcast only” and “Public” options toggled off.)
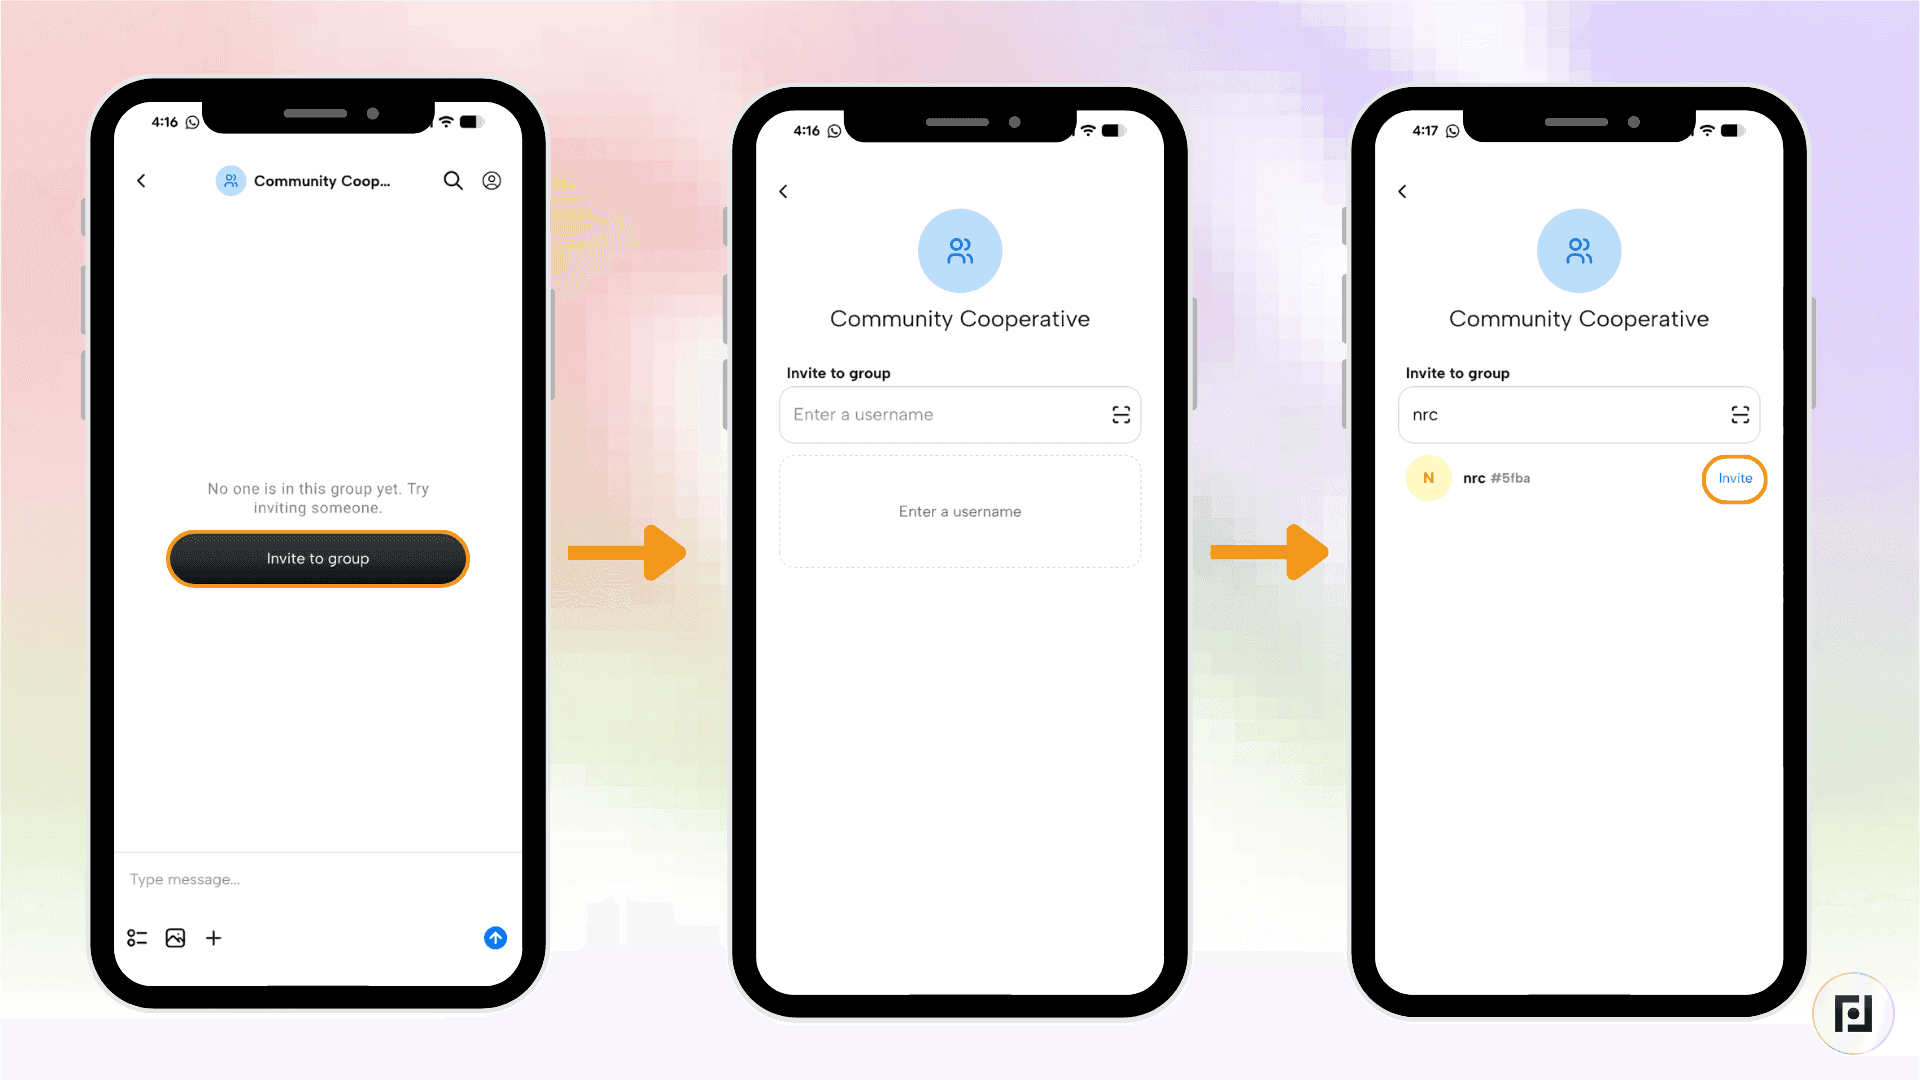
Step 3: Click the black “Invite to group” button and enter the user names or scan the QR codes of those you’d like to invite to the group.
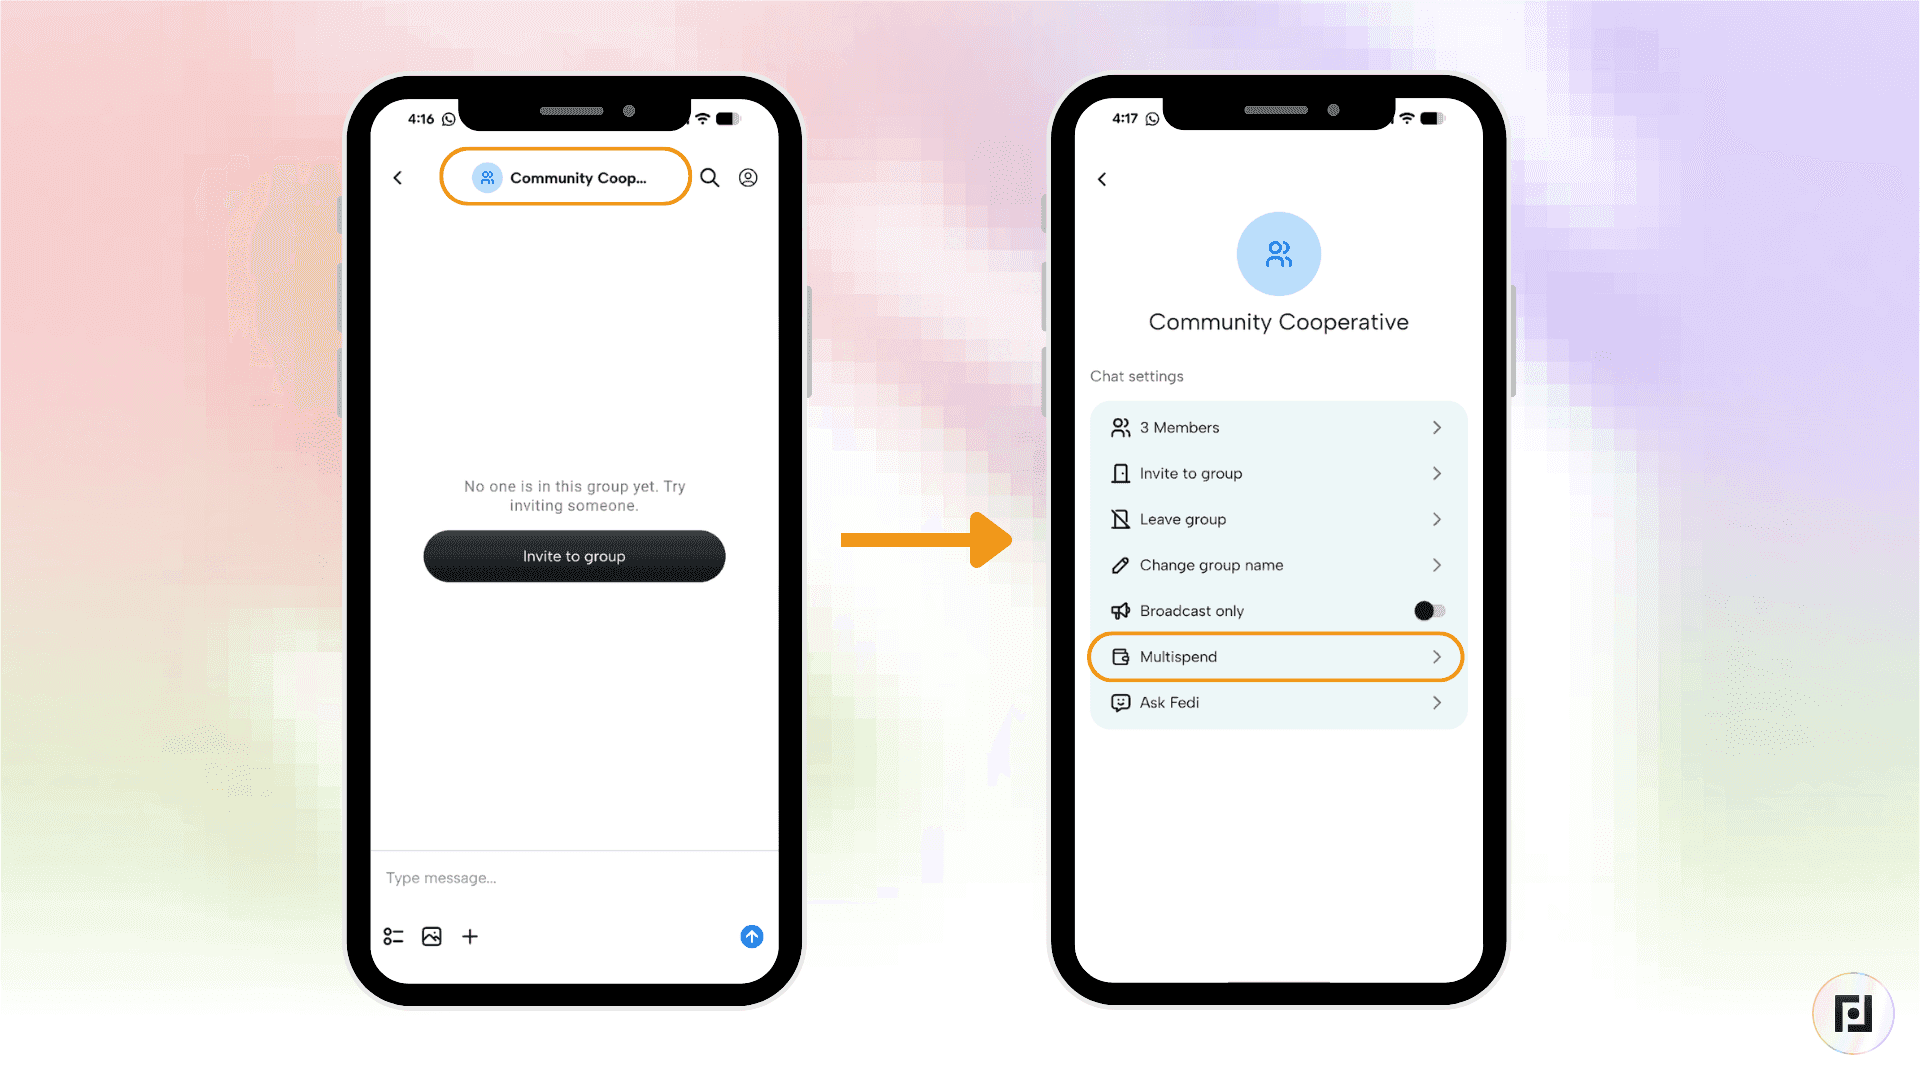
Step 4: Once the group has been created, open the group chat and click the name of the group at the top of the screen.
Under chat settings, click “Multispend” and then click on the name of the group chat toward the top of the screen. It will bring you to a “Chat settings” menu.
Step 5: Click the “Multispend” option, and, on the page entitled “Create Multispend”, choose the Federation you’d like to spend from.
Step 6: Click on “Assign Voters” and select all of the people from the group you’d like to have as voters. The maximum number of voters is 21. Next, click “Confirm”.
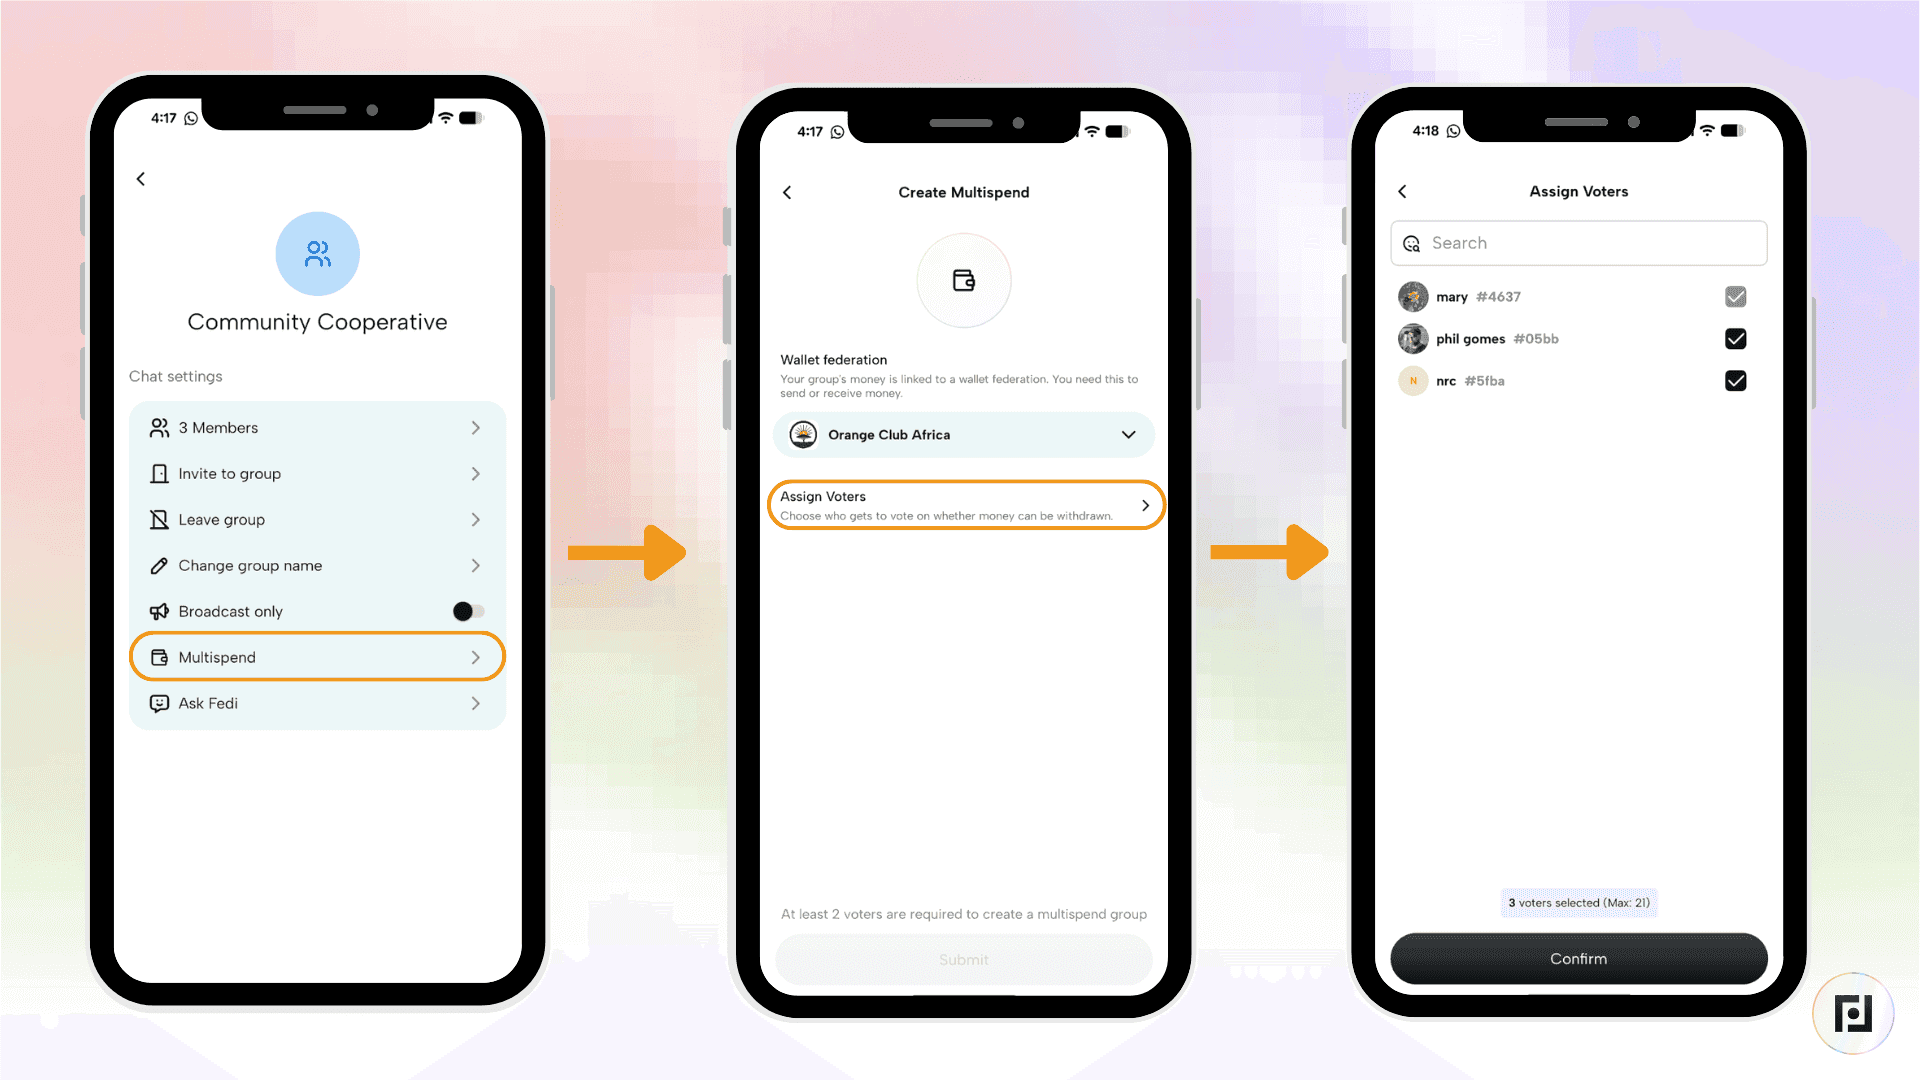
In the “Approval Threshold” field, select the voter threshold and click the black “Submit” button.
You will receive a message in the chat stating that you want to upgrade the chat to a Multispend group. You will have to wait until the other members of the group approve this.
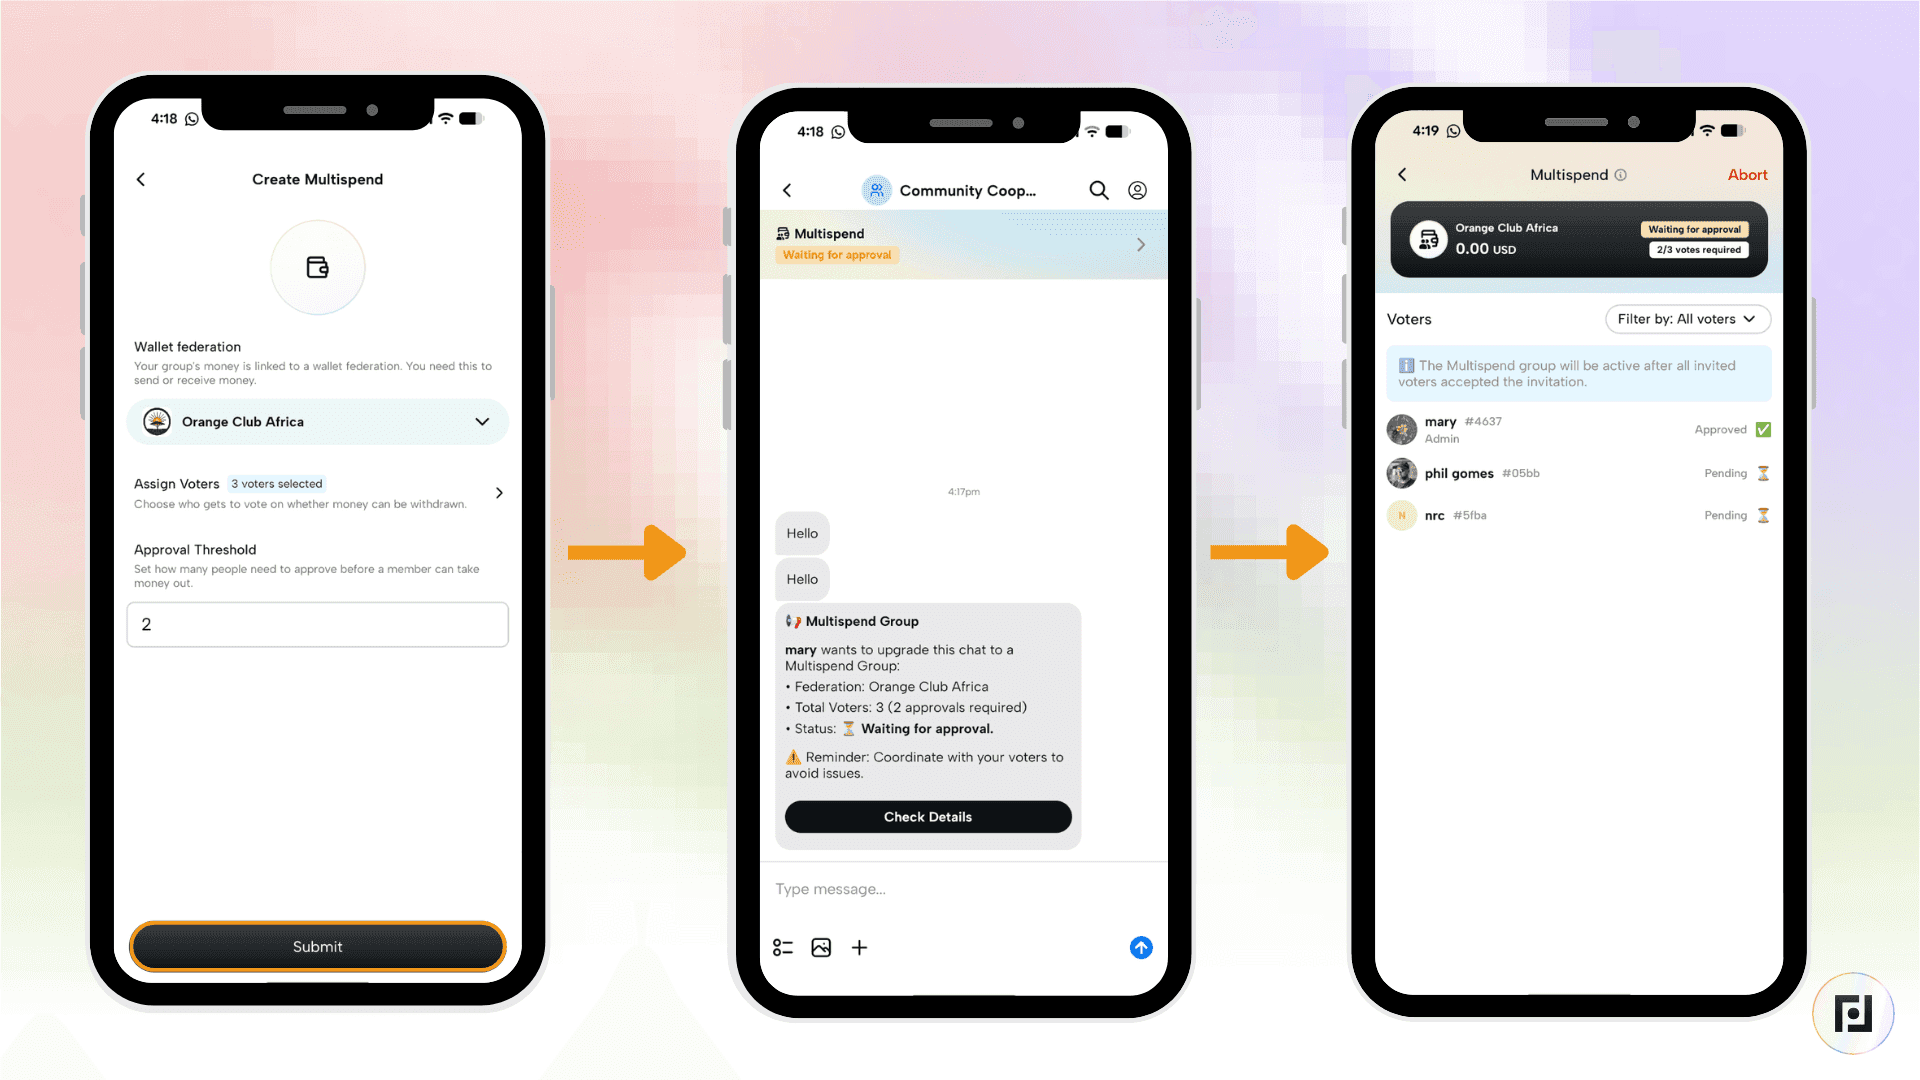
The other group members will have to accept the invitation. Their status will read “Pending” until they do.
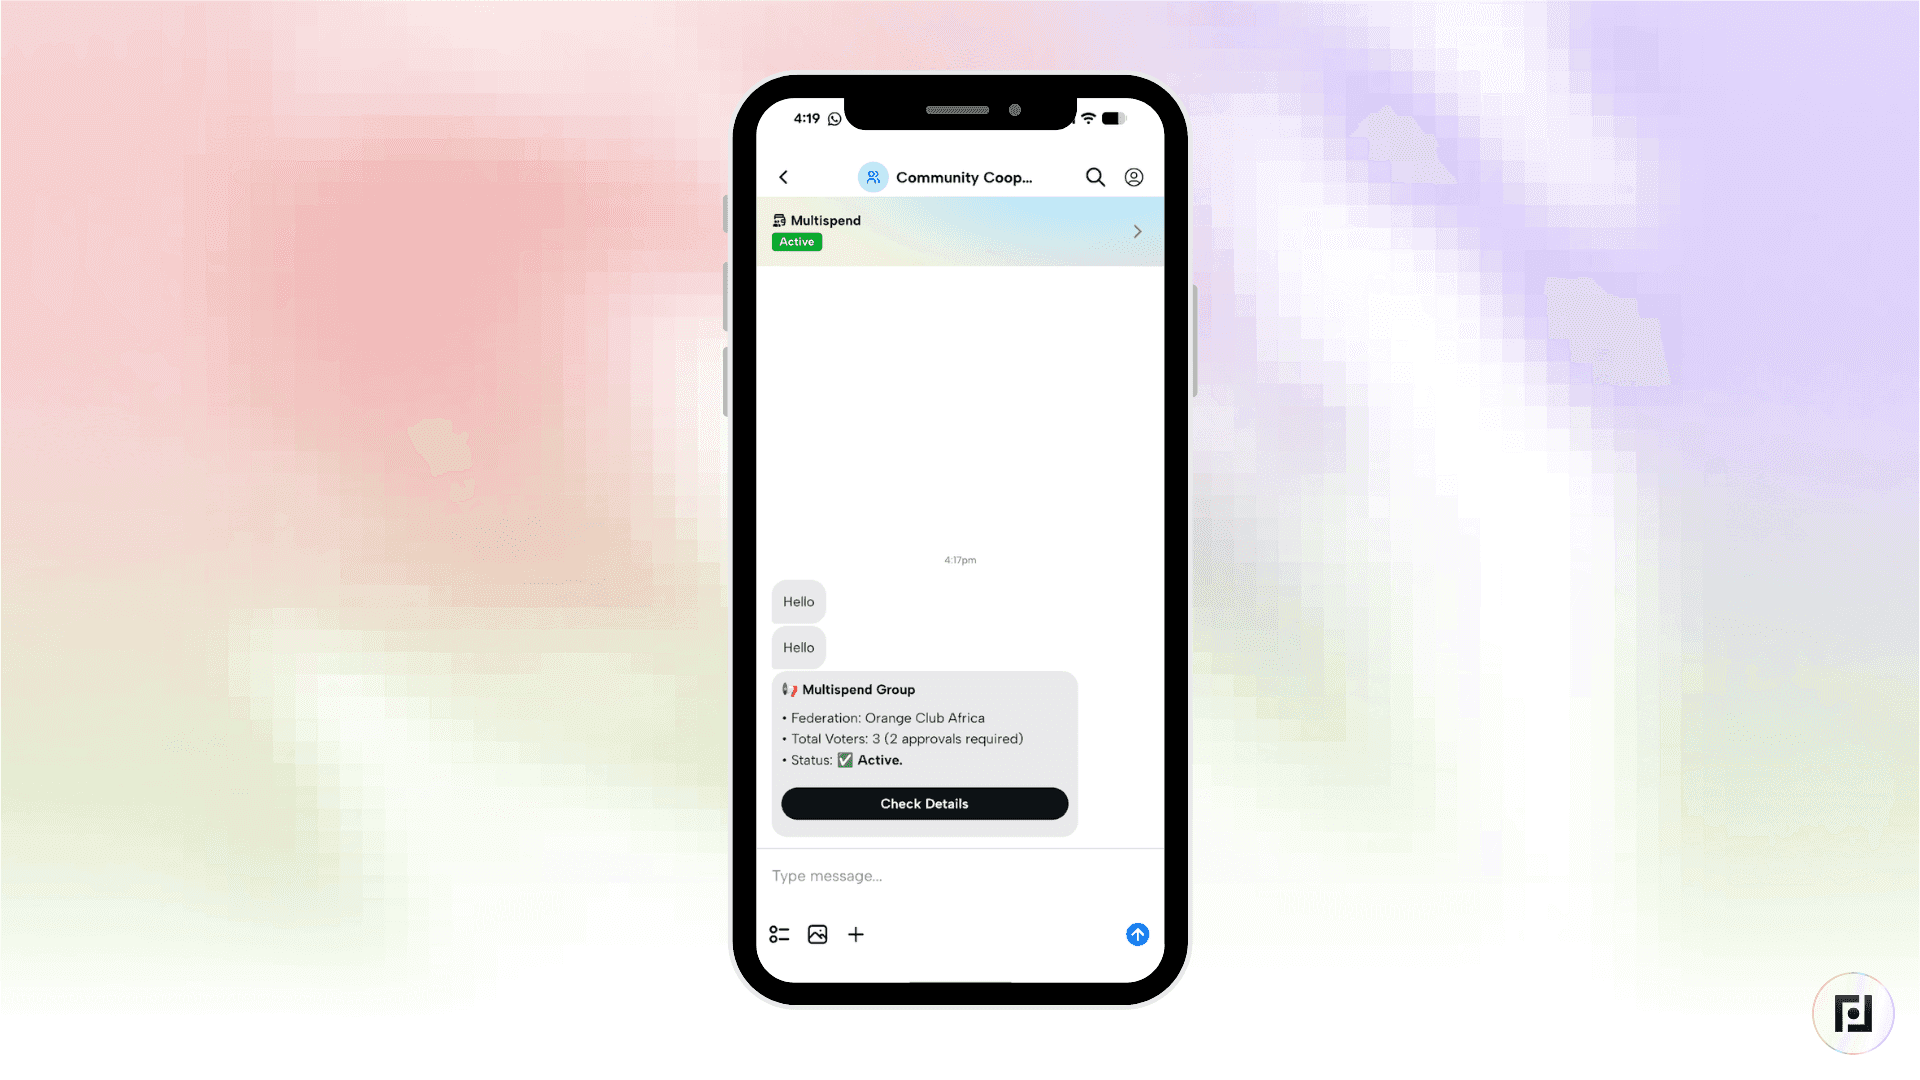
Once the group members have accepted the invitation, you’ll see a green “Active” sign in a bar at the top of the chat. To access the Multispend function, click that bar.
Tip 4: Create a CSV of Your Transaction History
Have you ever wished you could see a record of your transaction history on Fedi?
Fedi now makes it easy to obtain a .CSV file of your transaction history.
Here’s how to do it:
Step 1: Click on the “Account” button at the top right of your screen. It looks like a small circle with initials where your display picture will appear.
Step 2: Scroll down to the wallet service or Federation from which you want to obtain a record of your transaction history. Next, click on “Export transactions to .CSV”.
Step 3: Select where you want to save the .CSV file.
Tip 5: Customise Your Experience with Fedi
Although you’re not required to share personal details to create a Fedi account, it doesn't mean you can’t customize your account.
You can add your avatar or profile picture, change your username, select your desired currency or language, and make it so that a pin is necessary to access your account.
Add a Profile Photo and Update Your Username
Step 1: Click on the Account button at the top right of your screen.
Step 2: Next, click on “Edit Profile”. This will take you to the page to add your avatar and update your username. When you set up your Fedi account for the first time, you’re given a username at random. This is how you change it.
Step 3: Upload the profile photo of your choice or change your username. When done, click “Save”
Change Your Language
Step 1: Click on the Account button at the top right of your screen.
Step 2: Next, click on ‘Language”. This will give you a list of languages we support on the Fedi app.
Our goal in Fedi is to support as many languages as possible. If your language is not on the list, make sure to make a request on Ask Fedi. Ask Fedi is a default Mini App. To access Ask Fedi, click on the Mini Apps button at the bottom of your screen.
Step 3: Select the language of your choice.
Change Your Currency
Step 1: Click on the “Account” button at the top right of your screen.
Step 2: Next, click on ‘Display currency”. This will give you a list of currencies supported within the Fedi app.
If you don’t see your currency, please make a request on Ask Fedi.
Step 3: Select the currency of your choice and you’ll see within your wallet that the currency is updated.
Add a PIN
Step 1: Click on the “Account” button at the top right of your screen.
Step 2: Next, click on “Pin Access”. You will be prompted to input your desired pin. Once you’ve input the pin, you’ll be asked to confirm it.
There you go! You’ve successfully added your pin!
You can always go back to the same location to update your pin whenever you’d like.
Tip 6: Onboard Your Friends Faster
To invite a friend to a specific wallet service or Federation, to your community Space, or start a chat with you, the most convenient way is to share the invite QR code.
We recently updated our QR codes and invite links such that when you share the code (or link) with a friend who isn’t on Fedi, that code immediately prompts them to download the app and then join your Federation, Space or start a chat with you.
This makes it much easier to onboard a friend, help them access their first bitcoin wallet, and/or stay connected with you on Fedi.
